


本篇文章主要记录本人学习过程中的一些小干货。
hashcode和内存地址的区别(误区)
/*
HashCode不是内存地址,是根据排列算出来的一个值,相当于对象的身份证,
但绝不是内存地址,大家一定要注意这个误区。
Object的hashCode()默认是返回内存地址的,
但是hashCode()可以重写,所以hashCode()不能代表内存地址的不同。
System.identityHashCode(Object)方法可以返回对象的内存地址,不管该对象的类是否重写了hashCode()方法。
总之,String中值相同的hashcode一定相同,反之不然。
*/

String s1 = "abc";
String s2 = "abc";

int code1 = System.identityHashCode(s1);
int code2 = System.identityHashCode(s2);

System.out.println(code1); //460141958
System.out.println(code2); //460141958

String s3 = new String("abc");
String s4 = new String ("abc");

int code3 = System.identityHashCode(s3);
int code4 = System.identityHashCode(s4);

System.out.println(code3); //1163157884
System.out.println(code4); //1956725890

Object obj = new Object();
System.out.println(obj.hashCode()); //356573597
System.out.println(System.identityHashCode(obj)); //356573597
【Layui】实现跳转到指定tab栏
需求背景:实现页面之间的联动跳转,并跳转到指定tab栏
html代码:
<div class="layui-tab layui-tab-brief" lay-filter="current">
    <ul class="layui-tab-title">
      <li lay-id='one' class="layui-this">PHP</li>
      <li lay-id='two'>html</li>
      <li lay-id='three'>python</lilay_id='one'>
      <li lay-id='four'>go</li>
    </ul>

    <div class="layui-tab-content">
      <!--tab1-->
      <div class="layui-tab-item layui-show">
        内容1
      </div>
      <!--tab2-->
      <div class="layui-tab-item layui-show">
        内容2
      </div>
      <!--tab3-->
      <div class="layui-tab-item layui-show">
        内容3
      </div>
      <!--tab4-->
      <div class="layui-tab-item layui-show">
        内容4
      </div>

    </div>

</div>
lay-filter代表地址栏中参数的名称。
lay-id来作为唯一的匹配索引,以用于外部的定位切换。
JS部分:
<script>
layui.use('element', function(){
    var element = layui.element;
    //获取hash来切换选项卡,假设当前地址的hash为lay-id对应的值
    var layid = location.hash.replace(/^#current=/, '');//current为刚才定义的lay-filter
    element.tabChange('current', layid); //假设当前地址为:http://a.com#current=two,那么选项卡会自动切换到“html”这一项
    //监听Tab切换,以改变地址hash值
    element.on('tab(current)', function(){
        location.hash = 'current='+ this.getAttribute('lay-id');
    });
});
</script>
Layui表格列添加超链接
记录一下,需要用到templet属性,也就是自定义列模板
参考代码:
{ field: 'oddNumbers', width: 180, title: '单号', sort: true, fixed: 'left', templet: addLink },
addLink是个方法
function addLink(d) {
  var addLink = d.oddNumbers;
   if ('' == addLink || null == addLink || undefined == addLink) {
        return '';
   }
   if (addLink.length > 0) {
        return '<a class="layui-table-link" href="javascript:void(0);" lay-event="link">' + d.oddNumbers + '</a>';
   }
}
layui 2.2.5 开始,templet 开始支持函数形式,函数返回一个参数 d,包含接口返回的所有字段和数据。
参考链接
https://www.layui.com/demo/table/style.html
https://www.layui.com/doc/modules/table.html#templet
一般链接会打开一个tabs或弹窗或者其它,我用的弹窗,监听表格行,获取点击行数据,如下:
//pcList为table的lay-filter值
table.on('tool(pcList)', function (obj) {
      var checkStatus = obj.data;
      var url = checkStatus.oddNumbers;
      url = encodeURIComponent(url);
      console.log(checkStatus.oddNumbers);//单号
      layer.open({
           type: 2,
           title: '账票详细',
           shadeClose: true,
           shade: 0.8,
           area: ['60%', '90%'],
           content: 'newList.html?'+url
      });
 });
Layui表格table单元格加超链接功能
其中一列:
{field:'companyName', title: '公司名称', align: 'center',minWidth:200,templet:tplCompanyName }
模板方法:
var tplCompanyName = function (d) {
            var html = '<a style="color:#1E9FFF" href="javascript:void(0);" lay-event="showRec" >'+d.companyName+'</a>';
            return html;
        }
事件监听:
table.on('tool(myOrdersListTable)', function(obj){
			switch(obj.event){
				case 'showRec':
					active.showRec(obj);
					break;
			}
		});
然后定义active.showRec(obj);
var active = {
    showRec:function(obj){
        //...do your things
    }
}
springboot通过url访问本地图片
配置文件中:
#用户上传头像时配置的
#上传文件路径, 注意路径末尾一定要带上/
upload.path=C:/upload/
创建配置类:
package com.easyfund.springboot.config;

import org.springframework.beans.factory.annotation.Value;
import org.springframework.context.annotation.Configuration;
import org.springframework.web.servlet.config.annotation.ResourceHandlerRegistry;
import org.springframework.web.servlet.config.annotation.WebMvcConfigurer;

/**
 * @author lijing
 * @Description springboot通过url访问本地图片
 * @create 2020-09-27 16:38
 */
@Configuration
public class WebConfig implements WebMvcConfigurer {
    @Value("${upload.path}")
    private String uploadPath;

    @Override
    public void addResourceHandlers(ResourceHandlerRegistry registry) {
        //  /upload/images/**为前端URL访问路径  后面 file:xxxx为本地磁盘映射
        registry.addResourceHandler("/upload/images/**").addResourceLocations("file:" + uploadPath);
    }
}
上面配置的意思是,将http://localhost:8080/upload/images请求映射到本地的C:/upload/上
例如C:/upload/有一张图片1.png,那么访问路径是:http://localhost:8080/upload/images/1.png
layui的富文本使用
layui这个框架,总体上感觉样式还可以吧,不过问题挺多的,之前在开发过程中遇到了富文本的问题,因为layui的提交表单大多数都是异步提交,而这个富文本的是他们封装的textarea这个玩意,他的异步提交数据就是把富文本的数据先同步到textarea才能提交过去,这个bug一下子让我研究了一个多小时,最终有了解决办法,献给你们!!!
1、首先咱们先把layui给咱们封装好的富文本给显示出来:
<!--一定要加上lay-verify-->
<div class="layui-form-item layui-inline">
        <label class="layui-form-label">文章内容</label>
        <textarea id="fsContent" lay-verify="fsContent" name="fsContent" style="display: none;"></textarea>
    </div>
2、js部分:
<script>
    layui.config({
        base: '/admin/' //静态资源所在路径
    }).extend({
        index: 'lib/index' //主入口模块
    }).use(['index', 'form', 'upload', 'laydate', 'layedit'], function () {
        var $ = layui.$
            , form = layui.form
            , laydate = layui.laydate
            , layedit = layui.layedit;

        // 图片接口放到建立编辑器前面,否则无效
        layedit.set({
            uploadImage: {
                url: '/admin/fundSchool/uploadImg', //接口url
                type: 'post' //默认post
            }
        });

        // 设置编辑器
        layedit.build('fsContent', {
            height: 500 //设置编辑器高度
        });

        var index = layedit.build('fsContent'); //建立编辑器

        form.verify({ // 这里就是把富文本数据同步到<textarea>中
            fsContent: function (value) {
                return layedit.sync(index);
            }
        });

    })
</script>
这样基本上就解决啦。
不要慌,咱们在这里说一下富文本里面的导入图片!!!
 // 图片接口放到建立编辑器前面,否则无效
        layedit.set({
            uploadImage: {
                url: '/admin/fundSchool/uploadImg', //接口url
                type: 'post' //默认post
            }
        });
这段代码呢,不是所有的后台接口都能返回成功的。
根据看了layui的文档说出,返回类型是json 这个是肯定的,但是里面的参数必须跟文档一致:
{
  "code": 0 //0表示成功,其它失败
  ,"msg": "" //提示信息 //一般上传失败后返回
  ,"data": {
      "src": "图片路径"
    , "title": "图片名称" //可选
  }
}
富文本回显直接使用thymeleaf的标签:th:utext
Java中util.Date和sql.Date的相互转换
Java中Date的两个类
- java.util.Date通常情况下用它获取当前时间或构造时间
- java.sql.Date是针对SQL语句使用的,它只包含日期而没有时间部分
它们都有getTime方法返回毫秒数,都可以直接构造:
示例:
// util.date转换成sql.date
java.util.Date utilDate = new java.util.Date();	//获取当前时间
System.out.println(utilDate);
java.sql.Date sqlDate = new java.sql.Date(utilDate.getTime());
System.out.println(sqlDate);

// sql.date转换成util.date
java.sql.Date sqlDate1 = new java.sql.Date(new java.util.Date().getTime());
System.out.println(sqlDate1);
java.util.Date utilDate1 = new java.util.Date(sqlDate1.getTime());
System.out.println(utilDate1);
另外,不管是util.Date还是sql.Date都可以使用SimpleDateFormat去格式化日期格式。
关于日期格式问题可参考这篇文章:Java日期格式问题
java.util.Date在jdk1.8之后有新的替代了,具体请参见这篇文章:温顾 Java 8 日期 API
Java中的Date和Calendar的常用用法
在java中用到的最多的时间类莫过于 java.util.Date了,
由于Date类中将getYear(),getMonth()等获取年、月、日的方法都废弃了,
所以要借助于Calendar来获取年、月、日、周等比较常用的日期格式
注意:以下代码均已在jdk1.6中测试通过,其他版本可能使用不同,请注意!
Date与String的互转用法
/**
 * Date与String的互转用法,这里需要用到SimpleDateFormat
 */
Date currentTime = new Date();
SimpleDateFormat formatter = new SimpleDateFormat("yyyy-MM-dd");
String dateString = formatter.format(currentTime);
Date date = formatter.parse(dateString);1234567
Date与Calendar之间的互转
/**
 * Date与Calendar之间的互转
 */
Calendar  cal = Calendar.getInstance();
cal.setTime(new Date());
Date date1 = cal.getTime();123456
利用Calendar获取年、月、周、日、小时等时间域
/**
 * 利用Calendar获取年、月、周、日、小时等时间域
 */
cal.get(Calendar.YEAR);
cal.get(Calendar.MONTH);
cal.get(Calendar.WEEK_OF_MONTH);
cal.get(Calendar.DAY_OF_MONTH);1234567
对时间进行加减
/**
 * 对时间进行加减
 */
cal.add(Calendar.MONTH, 1);
System.out.println(cal.getTime());12345
算出给定日期是属于星期几
Calendarcal = Calendar.getInstance();
cal.set(2016,08,01);
String[] strDays = new String[] { "SUNDAY", "MONDAY", "TUESDAY",
                                  "WEDNESDAY", "THURSDAY", "FRIDAY", "SATURDAY"
                                };
System.out.println(strDays[cal.get(Calendar.DAY_OF_WEEK) - 1]);
解决layui富文本编辑器中图片显示过大的问题
在layedit.js中搜索inline-block
有这么一段:
img{display: inline-block; border: none; vertical-align: middle;}
在里面添加一条:
img{display: inline-block; border: none; vertical-align: middle;max-width:50%}
这样图片在富文本编辑器中显示最大宽度只会占富文本编辑器的一半。
layui上传文件
html:
<button type="button" class="layui-btn" id="uploadLawsFile"><i class="layui-icon"></i>上传法律文件</button>
<div class="layui-input-inline">
<input type="text" autocomplete="off" placeholder="法律文件所在地址"
class="layui-input" style="width:700px" id="lawsFileUrl">
</div>
js:
//上传法律文件
        upload.render({
            elem: '#uploadLawsFile'
            , url: '/admin/fundSchool/uploadLawsFile' //改成您自己的上传接口
            , accept: 'file' //普通文件
            , done: function (res) {
                if (res.code === 10000) {
                    layer.msg(res.msg, {icon: 1, offset: ['40%', '40%'], time: 1000});
                    $("#lawsFileUrl").val(res.filePath)
                } else {
                    layer.msg(res.msg, {icon: 2, offset: ['40%', '40%'], time: 2000});
                }
            }
        });
后台controller:
/**
     * 上传法律法规相关的文件
     *
     * @param lawsFile
     * @return
     */
    @PostMapping("/uploadLawsFile")
    @ResponseBody
    public Map<String, Object> uploadLawsFile(@RequestParam("file") MultipartFile lawsFile) {
        /*封装返回前端的数据*/
        Map<String, Object> map = new HashMap<>();
        /*本地路径*/
        String path = "E:\\workspace_idea\\E-fund-management-system\\springboot-consumer\\src\\main\\resources\\static\\upload\\lawsFiles";
        String filePath = "";
        if (lawsFile != null && lawsFile.getSize() > 0) {
            String originName = lawsFile.getOriginalFilename();//获取文件名
            String newName = UUID.randomUUID().toString() + originName.substring(originName.lastIndexOf("."));
            System.out.println(newName);
            filePath = "http://localhost:8080/upload/lawsFiles/" + newName;
            File targetFile = new File(path, newName);
            try {
                lawsFile.transferTo(targetFile);
            } catch (IOException e) {
                map.put("code", 10001);
                map.put("msg", "上传失败");
                return map;
            }
        }
        map.put("code", 10000);
        map.put("msg", "上传成功");
        map.put("filePath", filePath);
        return map;
    }
layui实现clipboard.js自动复制
1.引入clipboard.min.js
2.html:
<div class="layui-input-inline">
                    <input type="text" autocomplete="off" placeholder="法律文件所在地址"
                           class="layui-input" style="width:600px" id="lawsFileUrl">
                </div>

                <div class="layui-input-inline">
                    <button id="copyBtn" class="layui-btn" data-clipboard-target="#lawsFileUrl">
                        复制地址
                    </button>
                </div>
3.js:
var clipboard = new ClipboardJS("#copyBtn")

    clipboard.on('success', function (e) {
        layer.msg("复制成功", {icon: 1, offset: ['40%', '40%'], time: 1000});
    });

    clipboard.on('error', function (e) {
        layer.msg("复制失败,请手动复制", {icon: 2, offset: ['40%', '40%'], time: 1000});
    });
FastDFS连接超时(java.net.ConnectException: Connection timed out: connect)解决方案
(1)因为FastDFS服务器搭建在公网上、需要开放如下端口:
自定义	TCP	22122	fastDFS	修改|删除
自定义	TCP	23000	fastDFS_storage	修改|删除
自定义	TCP	8888	fastDFS_storage	修改|删除
(2)修改FastDFS服务器上storage.conf文件中tracker_server选项服务器地址为公网IP地址
到此问题解决。
从一个页面的nav跳转到对应页面的tab处
跳转页面:
<!-- 跳转页面 -->
<!DOCTYPE html>
<html>
    <head>
        <meta charset="utf-8">
        <title>点击跳转页</title>
    </head>
    <style type="text/css">
        .page{
            display: inline-block;
            width: 120px;
            height: 30px;
            line-height: 30px;
            text-align: center;
            background: #ddd;
            color: red;
            font-size: 16px;
            text-decoration: none;
            margin-right: 24px;
        }
    </style>
    <body>
        <a class="page" href="target_page.html?type=0">跳转第一页面</a>
        <a class="page" href="target_page.html?type=1">跳转第二页面</a>
        <a class="page" href="target_page.html?type=2">跳转第三页面</a>
    </body>
</html>
被跳转页面:
<!-- 被跳转页面 -->
<!DOCTYPE html>
<html>
    <head>
        <meta charset="utf-8">
        <title>模拟点击目标页</title>
    </head>
    <style type="text/css">
        .nav-panel{
            display: flex;
            align-items: center;
            justify-content: flex-start;
        }
        .nav-subitem{
            width: 80px;
            height: 30px;
            line-height: 30px;
            text-align: center;
            font-size: 16px;
            border: 1px solid red;
            margin:  0 24px 16px 0;
            color: red;
            cursor: pointer;
        }
        .nav-active{
            background: red;
            color: #fff;
        }
        .content-subitem{
            width: 200px;
            height: 200px;
            line-height: 200px;
            text-align: center;
            color: #fff;
            font-size: 24px;
            display: none;/* 默认隐藏 */

        }
        .content-block{
            display: block;/* 需要显示的元素使用该class */
        }
    </style>
    <body>
        <div class="nav-panel">
            <div class="nav-subitem nav-active">菜单一项</div>
            <div class="nav-subitem">菜单二项</div>
            <div class="nav-subitem">菜单三项</div>
        </div>
        <div class="content-panel">
             <div class="content-subitem content-block" style="background: red">
                 第一页面内容
             </div>
             <div class="content-subitem" style="background: blue;">
                 第二页面内容
             </div>
             <div class="content-subitem" style="background: #7fb80e;">
                 第三页面内容
             </div>
        </div>
    </body>
    <script src="https://cdn.bootcss.com/jquery/3.4.1/jquery.min.js"></script>
    <script type="text/javascript">
        // 点击tab切换页面
        /* $(".nav-panel .nav-subitem").on("click",function(){
            $(this).addClass("nav-active").siblings().removeClass("nav-active");
            $(".content-panel .content-subitem").eq($(this).index()).show().siblings().hide();
        }) */
        $(function(){
            // getQueryVariable函数用于获取url携带参数
            var type = getQueryVariable('type');
            console.log(type)
            if(type){
                $(".nav-panel .nav-subitem").eq(type).click();
            }
        })
        // 方式一(正则表达式)
        // variable为url参数的key
        function getQueryVariable(variable)
        {
            // 构造一个含有variable(目标)参数的正则表达式对象
            var reg = new RegExp("(^|&)"+ variable +"=([^&]*)(&|$)");
            //获得了当前链接的中?号后的参数(匹配目标参数)
            var r = window.location.search.substr(1).match(reg);
            console.log(r)
            //返回目标参数
            // unescape() 函数可对通过 escape() 编码的字符串进行解码。
            if(r!=null)return  unescape(r[2]); return null;
        }
        //方式二(使用js 获取参数值)
        // function getQueryVariable(variable) {    //variable为url参数的key
        // var query = window.location.search.substring(1); //获取url中"?"符后的字串,截取?后的字符串
        // var vars = query.split("&");  //字符串按照&拆分
        // for(var i = 0; i < vars.length; i++) {
        // var pair = vars[i].split("=");  //获取每一个参数
        // if(pair[0] == variable) {
        // return pair[1];   //获取参数值
        // }
        // }
        // return(false);
        // }

    </script>
</html>
自己测试可行性!!!!
dubbo用@Reference注入Realm失败
最近做项目用SpringBoot+Dubbo+Shiro做项目框架,在调试shiro自定义Realm权限的时候发现,@Reference注入的dubboService为null;网上查了好多,但都没有完美解决问题,问题的原因是shirofilter加载顺序引起的。
解决问题的方法为:将dubbo bean转为spring bean,再用spring上下(ApplicationContext)转为dubbo bean 就可以了。
原文:代码先锋网
spring上下文转换工具:
package com.easyfund.springboot.util;

import org.springframework.beans.BeansException;
import org.springframework.context.ApplicationContext;
import org.springframework.context.ApplicationContextAware;
import org.springframework.stereotype.Component;

/**
 * @author lijing
 * @Description Spring上下文转换工具
 * @create 2020-10-09 14:22
 */
@Component
public class SpringBeanFactoryUtil implements ApplicationContextAware {

    private static ApplicationContext context = null;

    public static <T> T getBean(String name, Class<T> type) {
        return context.getBean(name, type);
    }

    @Override
    public void setApplicationContext(ApplicationContext applicationContext) throws BeansException {
        if (SpringBeanFactoryUtil.context == null) {
            SpringBeanFactoryUtil.context = applicationContext;
        }
    }
}
将dubbo bean转为spring bean。先用@Reference引入,再用@Bean转换:
package com.easyfund.springboot.util;

import com.alibaba.dubbo.config.annotation.Reference;
import com.easyfund.springboot.biz.UserBiz;
import org.springframework.context.annotation.Bean;
import org.springframework.stereotype.Component;

/**
 * @author lijing
 * @Description  Spring上下文转换工具
 * @create 2020-10-09 14:24
 */

@Component
public class BeanFactoryUtil {

    @Reference(interfaceClass = UserBiz.class, version = "1.0.0", check = false)
    private UserBiz userBiz;

    @Bean(name = "userBiz")
    public UserBiz getSysUserDubboService() {
        return userBiz;
    }

}
最后是在Realm中调用。
//定义一个userBiz
private UserBiz userBiz;
if (this.userBiz == null) {
    this.userBiz = SpringBeanFactoryUtil.getBean("userBiz", UserBiz.class);
}
这样就解决了!
springboot设置session过期时间
#session过期时间
#单位(s)  这里是24小时
server.servlet.session.timeout=86400
thymeleaf:字符串Strings常见的使用方法
#判断是不是为空:null:
<span th:if="${name} != null">不为空</span>
<span th:if="${name1} == null">为空</span>
#判断是不是为空字符串: “”
<span th:if="${#strings.isEmpty(name1)}">空的</span>
#判断是否相同:
<span th:if="${name} eq 'jack'">相同于jack,</span>
<span th:if="${name} eq 'ywj'">相同于ywj,</span>
<span th:if="${name} ne 'jack'">不相同于jack,</span>
#不存在设置默认值:
<span th:text="${name2} ?: '默认值'"></span>
#是否包含(分大小写):
<span th:if="${#strings.contains(name,'ez')}">包ez</span>
<span th:if="${#strings.contains(name,'y')}">包j</span>
#是否包含(不分大小写)
<span th:if="${#strings.containsIgnoreCase(name,'y')}">包j</span>
#同理。。。下面的和JAVA的String基本一样。。。。不笔记解释,官网有

${#strings.startsWith(name,'o')}
${#strings.endsWith(name, 'o')}
${#strings.indexOf(name,frag)}# 下标
${#strings.substring(name,3,5)}# 截取
${#strings.substringAfter(name,prefix)}# 从 prefix之后的一位开始截取到最后,比如 (ywj,y) = wj, #如果是(abccdefg,c) = cdefg//里面有2个c,取的是第一个c
${#strings.substringBefore(name,suffix)}# 同上,不过是往前截取
${#strings.replace(name,'las','ler')}# 替换
${#strings.prepend(str,prefix)}# 拼字字符串在str前面
${#strings.append(str,suffix)}# 和上面相反,接在后面
${#strings.toUpperCase(name)}
${#strings.toLowerCase(name)}
${#strings.trim(str)}
${#strings.length(str)}
${#strings.abbreviate(str,10)}# 我的理解是 str截取0-10位,后面的全部用…这个点代替,注意,最小是3位
利用js预览上传的图片
备注:使用form表单进行向后端的提交带文件的数据时,需要指定form表单的提交属性 在form表单中加上enctype属性 enctype=multipart/form-data,同样的使用ajax向后端提交带文件的数据时也需要类似的属性:1.添加两个属性processData:false,contentType:false 2.data必须是FormData()类型
<img id="head_picture" width="110" height="110" th:src="${session.user.headerImage}"
                         th:if="${not #strings.isEmpty(session.user.headerImage)}"></img>
                    <input id="head_picture_file" class="my_info_content_care_table_file" name="" type="file">

<script>
    //预览上传的头像
    $("#head_picture_file").change(function (e) {
        var reader = new FileReader();
        file = e.target.files[0];
        if (!/image\/\w+/.test(file.type)) {//判断文件的是不是图片
            alert("上传的文件格式不对,请重新上传...");
            return false;
        }
        reader.readAsDataURL(file);
        reader.onload = function (e) {
            $("#head_picture").attr("src", "" + this.result + "");
        };
    });
</script>
FormData控制台打印为空及使用方法
之前使用formData都是在network中查看参数,最近在做一个项目,接口还没有,用的假数据做的交互,突发奇想的console.log了 一下,结果是空的。
一开始以为append失效了,经过查证原来:FormData是一种特殊类型的对象,它不可字符串化,不能仅使用console.log打印出来。
如果需要打印可以:
formData.forEach((value, key) => {
     console.log("key %s: value %s", key, value);
})
FormData常用方法:
一.创建一个formData对象实例的方式
1、创建一个空对象

var formData = new FormData();//通过append方法添加数据
1
2、使用已有表单来初始化对象

//表单示例
<form id="myForm" action="" method="post">
    <input type="text" name="name">名字
    <input type="password" name="psw">密码
    <input type="submit" value="提交">
</form>

//方法示例
// 获取页面已有的一个form表单
var form = document.getElementById("myForm");
// 用表单来初始化
var formData = new FormData(form);
// 我们可以根据name来访问表单中的字段
var name = formData.get("name"); // 获取名字
var psw = formData.get("psw"); // 获取密码
// 当然也可以在此基础上,添加其他数据
formData.append("token","kshdfiwi3rh");


二. 操作方法
formData里面存储的数据是以健值对的形式存在的,key是唯一的,一个key可能对应多个value。
如果是使用表单初始化,每一个表单字段对应一条数据,它们的HTML name属性即为key值,它们value属性对应value值。
1.获取值

//通过get(key)/getAll(key)来获取对应的value
formData.get("name"); // 获取key为name的第一个值
formData.get("name"); // 返回一个数组,获取key为name的所有值


//通过append(key, value)来添加数据,如果指定的key不存在则会新增一条数据,如果key存在,则添加到数据的末尾
formData.append("k1", "v1");
formData.append("k1", "v2");
formData.append("k1", "v3");
获取值时方式及结果如下

formData.get("k1"); // "v1"
formData.getAll("k1"); // ["v1","v2","v3"]
3.设置修改数据

//set(key, value)来设置修改数据,如果指定的key不存在则会新增一条,如果存在,则会修改对应的value值
formData.append("k1", "v1");
formData.set("k1", "1");
formData.getAll("k1"); // ["1"]
4.判断是否存在对应数据

//has(key)来判断是否对应的key值
formData.append("k1", "v1");
formData.append("k2",null);

formData.has("k1"); // true
formData.has("k2"); // true
formData.has("k3"); // false
5.删除数据

//delete(key)删除数据
formData.append("k1", "v1");
formData.append("k1", "v2");
formData.append("k1", "v1");
formData.delete("k1");

formData.getAll("k1"); // []
ajax请求后 出现自动刷新当前页面情况
ajax请求后,返回当前页面success function 函数也执行了
但是就在此时 整个页面自动刷新了
经过我仔细认真的观察与分析后,然而并没有得出什么结果。
最后问了问度娘,他告诉我,button 的 type属性 不能为 submit ,如果为submit 就等同于 form 表单,会提交请求,而我又没有写请求地址,那么请求会提交到本页面,也就有了请求后刷新的现象。
所以,
<button id="sub" type="submit" >请求ajax</button>
与
<form>   //不写action

</form>
这两种情况,都会出现请求。
解决方法:
1.删除button 中的type 属性,利用id 或者 onclick 去触发函数,因为如果不写type属性,那么默认就是button
2.删掉 form 标签,form 标签如果什么内容都没写,会重新提交到本页面
base64,file和blob相互转换
1.第一个:base64转为Blob
function dataURLtoBlob(dataurl) {
    var arr = dataurl.split(','), mime = arr[0].match(/:(.*?);/)[1],
        bstr = atob(arr[1]), n = bstr.length, u8arr = new Uint8Array(n);
    while (n--) {
        u8arr[n] = bstr.charCodeAt(n);
    }
    return new Blob([u8arr], { type: mime });
}
2.第二个:Blob转为base64
function blobToDataURL(blob, callback) {
    let a = new FileReader();
    a.onload = function (e) { callback(e.target.result); }
    a.readAsDataURL(blob);
}
3.第三个:base64转换为file
function dataURLtoFile(dataurl, filename) {//将base64转换为文件
        var arr = dataurl.split(','), mime = arr[0].match(/:(.*?);/)[1],
            bstr = atob(arr[1]), n = bstr.length, u8arr = new Uint8Array(n);
        while(n--){
            u8arr[n] = bstr.charCodeAt(n);
        }
        return new File([u8arr], filename, {type:mime});
    }
4.第四个:js图片转换为base64
function getImgToBase64(url,callback){//将图片转换为Base64
  var canvas = document.createElement('canvas'),
    ctx = canvas.getContext('2d'),
    img = new Image;
  img.crossOrigin = 'Anonymous';
  img.onload = function(){
    canvas.height = img.height;
    canvas.width = img.width;
    ctx.drawImage(img,0,0);
    var dataURL = canvas.toDataURL('image/png');
    callback(dataURL);
    canvas = null;
  };
  img.src = url;
}
第五个:在Java中base64和File相互转换
/**
     * 文件转base64字符串
     * @param file
     * @return
     */
    public static String fileToBase64(File file) {
        String base64 = null;
        InputStream in = null;
        try {
            in = new FileInputStream(file);
            byte[] bytes = new byte[in.available()];
            int length = in.read(bytes);
            base64 = Base64.encodeToString(bytes, 0, length, Base64.DEFAULT);
        } catch (FileNotFoundException e) {
            // TODO Auto-generated catch block
            e.printStackTrace();
        } catch (IOException e) {
            // TODO Auto-generated catch block
            e.printStackTrace();
        } finally {
            try {
                if (in != null) {
                    in.close();
                }
            } catch (IOException e) {
                // TODO Auto-generated catch block
                e.printStackTrace();
            }
        }
        return base64;
    }

    /**
     * base64字符串转文件
     * @param base64
     * @return
     */
    public static File base64ToFile(String base64) {
        File file = null;
        String fileName = "/Petssions/record/testFile.amr";
        FileOutputStream out = null;
        try {
            // 解码,然后将字节转换为文件
            file = new File(Environment.getExternalStorageDirectory(), fileName);
            if (!file.exists())
                file.createNewFile();
            byte[] bytes = Base64.decode(base64, Base64.DEFAULT);// 将字符串转换为byte数组
            ByteArrayInputStream in = new ByteArrayInputStream(bytes);
            byte[] buffer = new byte[1024];
            out = new FileOutputStream(file);
            int bytesum = 0;
            int byteread = 0;
            while ((byteread = in.read(buffer)) != -1) {
                bytesum += byteread;
                out.write(buffer, 0, byteread); // 文件写操作
            }
        } catch (IOException ioe) {
            ioe.printStackTrace();
        } finally {
            try {
                if (out!= null) {
                    out.close();
                }
            } catch (IOException e) {
                // TODO Auto-generated catch block
                e.printStackTrace();
            }
        }
        return file;
    }
使用cropper做图片裁剪,web端上传头像,前后台数据传输
首先了解下图像传输的类型,及相互转化,我用的是将裁剪后的base64图片转成file,后台接收file进行存储到本地磁盘。
如果直接存储到数据库,可以用blob类型传输。
https://www.cnblogs.com/whitewen/articles/10456410.html
1、前台HTML页面
这里初始化是挂载到img节点上,然后可以外包一个盒子对他的大小来做限制,onerror为头像加载失败后的默认图片
<div class="container" id="crop-avatar">
<!-- Current avatar -->
<div class="avatar-view">
  <img src="${root}${obj.imgurl}" alt="修改头像" onerror="this.src = '${root}/app/img/main/user.png'"/>
</div>
记得先引入三个文件
<link href="/path/to/cropper.css" rel="stylesheet">
<script src="/path/to/jquery.js"></script>
<script src="/path/to/cropper.js"></script>
2、js裁剪及ajax文件上传
this.$img.cropper({
aspectRatio: 1,
preview: this.$avatarPreview.selector,
strict: false,
crop: function (data) {
  var json = [
      '{"x":' + data.x
      '"y":' + data.y,
      '"height":' + data.height,
      '"width":' + data.width,
      '"rotate":' + data.rotate + '}'
  ].join();
  _this.$avatarData.val(json);
}
});
生成裁剪框进行裁剪,获取裁剪后的图片信息,这样拿到的格式是base64,为了方便传输,转成了file,后台接收就可以用普通form提交的方法进行接收处理。
var imgData = this.$img.cropper('getCroppedCanvas')

var dataurl = imgData.toDataURL('image/jpeg', 0.4); //dataurl便是base64图片,0.4是指图片清晰度

var file = this.dataURLtoFile(dataurl, "tu.jpeg");//将base64图片转化为file文件方法
base64转file的方法
//将base64格式图片转换为文件形式
dataURLtoFile: function (dataurl, filename) {
var arr = dataurl.split(','), mime = arr[0].match(/:(.*?);/)[1],
  bstr = atob(arr[1]), n = bstr.length, u8arr = new Uint8Array(n);
while (n--) {
  u8arr[n] = bstr.charCodeAt(n);
}
return new File([u8arr], filename, {type: mime});
},
ajax请求,用formdata进行传输,file为上面由base64转的file。
var formData = new FormData();
formData.append("file", file);
$.ajax(url, {
type: 'post',
data: formData,
dataType: 'json',
processData: false, // 告诉jQuery不要去处理发送的数据
contentType: false, // 告诉jQuery不要去设置Content-Type请求头
success: function (data) {
  _this.submitDone(data);
},
});
3、后台接收处理
后台用的Java、ssh。保存到了本地磁盘。
@RequestMapping(value = "/resetPhoto")
@SystemControllerLog(module = "设置用户头像", operate = "设置当前用户头像")
@ResponseBody
public HashMap setUserProfile(@RequestParam(value = "file", required = true) MultipartFile newProfile, HttpServletRequest request) {
/** 头像保存路径 */
HashMap map = new HashMap();
if (!newProfile.isEmpty()) {
   // 当前用户
   Users currentUser = (Users) request.getSession().getAttribute("userInfo");
   // 默认以原来的头像名称为新头像的名称,这样可以直接替换掉文件夹中对应的旧头像
   String profilePathAndNameDB = currentUser.getImgurl();
   String rootPath = request.getSession().getServletContext().getRealPath("");//服务器存储的磁盘地址
   String id = UUID.randomUUID().toString().substring(0, 32);//防止图片名重复
   String last = newProfile.getOriginalFilename().substring(newProfile.getOriginalFilename().lastIndexOf("."));//图片类型.png
   String newProfileName = rootPath + profilePathAndNameDB;//图片存储路径
   String path = profilePathAndNameDB;//数据库存储路径,返回前台的路径
   // 数据库头像地址不存在
   if (profilePathAndNameDB == null || "".equals(profilePathAndNameDB)) {
       newProfileName = rootPath + "/app/upload/" + id + last;//图片存储路径
       path = "/app/upload/" + id + last;//数据库存储路径
       currentUser.setImgurl(path);
       uService.updateUsers(currentUser);
   }

   // 磁盘保存
   BufferedOutputStream out = null;
   try {
       File folder = new File(rootPath);
       if (!folder.exists())
           folder.mkdirs();
       out = new BufferedOutputStream(new FileOutputStream(newProfileName));
       // 写入新文件
       out.write(newProfile.getBytes());
       out.flush();
   } catch (Exception e) {
       e.printStackTrace();
       map.put("code", "-1");
       return map;
   } finally {
       try {
           out.close();
       } catch (IOException e) {

           e.printStackTrace();
       }
   }
   map.put("code", "1");
   map.put("result", path);
   return map;
} else {
   map.put("code", "-1");
   return map;
}
}
遇到的坑:
1、前后台数据传输的时候,前台要么400要么500,是因为前后台传输和接收的数据类型不一致。所以统一改成了file传输。用base64可以在后台做一下处理。
2、参考的demo比较坑,他将所有变量放在一起,代码的写法也看不懂,还好调试出来了。
3、后台存储的时候,文件路径我本来随便建了一个文件夹,将图片放在里面,可以进行存储,但是页面却读不到,一直报错Not allowed to load local resource ,最终发现是spring配置文件的问题,静态资源必须放在app文件下面
<mvc:resources mapping="/app/**" location="/app/" />
4、图片上传成功后,页面不刷新。是因为为了减少图片存储,我查询了一下数据库,如果数据库原来的图片已经定义了,那就用原来图片的名字,直接覆盖,浏览器缓存导致页面路径不变,图片不刷新。解决方法
# 在路径后面加随机数,让浏览器检测到变化,从而绕过缓存读取服务器中的图片。
this.$avatar.attr('src', this.url + "?t=" + Math.random());
JQUERY 获取IFrame中对象及获取其父窗口中对象示例
/*在web开发中,经常会用到iframe,难免会碰到需要在父窗口中使用iframe中的元素、或者在iframe框架中使用父窗口的元素
在父窗口中获取iframe中的元素*/

格式:$("#iframe的ID").contents().find("#iframe中的控件ID").click();
实例:$("#ifm").contents().find("#btnOk").click();

在iframe中获取父窗口的元素
格式:$('#父窗口中的元素ID', parent.document).click();
实例:$('#btnOk', parent.document).click();
layui-table对返回的数据进行转变显示的实例
在使用layui表格时,在ajax请求回来的数据,有时候需要我们处理之后显示
1.比如性别sex这个字段,后台可能返回的是1.或者 2;那我们总不能显示1.和 2,我们需要显示男和女,这里就用到了自定义模板了
<script type="text/html" id="barDemo">
{{#if (d.sex == 1) { }}
<span>男</span>
{{# }else if(d.sex == 2){ }}
<span>女</span>
{{# } }}
</script>
layui模板代码中获取表格的列值
{title: '操作', width: 160, align: 'center', toolbar: '#subBtn'}
<script type="text/html" id="subBtn">
    <a class="layui-btn layui-btn-normal layui-btn-xs" lay-event="addSelf"
       th:onclick="addSelf([[${session.user}]],{{d.id}})"><i
            class="layui-icon layui-icon-addition"></i>添加自选</a>
</script>
快速下载js文件
前提是安装了node环境
# 建一个文件夹,名字是英文的
# 进入文件夹,执行以下命令
npm init
# 如果你想下载vue
cnpm install vue
# 如果你想下载axios
cnpm install axios

# 然后到生成的目录中找相关的文件即可
node sass和当前环境不兼容问题
启动报错:Node Sass does not yet support your current environment: Windows 64-bit with Unsupported runtime (64)
解决办法:
# node sass不支持当前环境,所以可以直接删掉原来不支持本机的node sass,再重新安装支持的就行了
# 建议使用淘宝镜像
# 删除:
cnpm uninstall --save node-sass
# 安装:
cnpm install --save node-sass
用Jedis连接阿里云等服务器上的redis
1、配置redis.conf
-
设置访问redis的密码:requirepass 要设置密码
-
注释 bind 127.0.0.1
-
(重启redis-server服务,进入redis后要先验证密码,用这个命令:auth 密码 ,然后ping一下看有没有配置成功)
$> redis-cli -p 6379
127.0.0.1:6379> auth 你的密码
OK
2、 idea访问时添加auth密码
Jedis jedis = new Jedis("服务器的外网ip",6379);

jedis.auth("redis的密码");

System.out.println(jedis.ping());

// 输出PONG的话就成功了
常用的IDEA快捷键
ctrl+shift+alt:#多行操作
psvm:#生成main()方法;
fori:#生成for循环;
Ctrl+Alt+v:#自动补齐返回值类型
ctrl+o:#覆写方法
ctrl+i:#实现接口中的方法
ctrl+shift+u:#大小写转换
CTRL+SHIFT+Z:#取消撤销
Alt+Insert:#生成构造方法、getter、setter
ctrl+y:#删除当前行
Ctrl+Shift+J:#将选中的行合并成一行
ctrl+g:#定位到某一行
Ctrl+Shitft+向下箭头:#将光标所在的代码块向下整体移动
Ctrl+Shift+向上箭头:#将光标所在的代码块向上整体移动
Alt+Shift+向下箭头:#将行向下移动
Alt+Shift+向上箭头:#将行向上移动
Ctrl+F:#在当前文件中查找
Ctrl+R:#替换字符串
Ctrl+Shift+F: #在全局文件中查找字符串
Ctrl+Shift+R:#在全局中替换字符串
Ctrl+Shift+Enter:#自动补齐{}或者分号;
Shift+Enter:#在当前行的下方开始新行
Ctrl+Alt+Enter:#在当前行的上方插入新行
Ctrl+Delete:#删除光标所在至单词结尾处的所有字符
Docker 挂载nginx数据卷失败直接关闭问题
问题:
使用docker 挂在nginx配置文件镜像,挂载数据卷失败并且容器直接退出
解决:
这里先说解决办法:
- 首先启动一个nginx容器,然后使用cp命令拷贝一份配置文件到宿主机,然后删除容器。我是整个nginx一起拷贝,也可以拷贝单个配置文件
docker cp 容器id:/etc/nginx /etc/nginx
- 然后重新启动容器,并挂载镜像
docker run -d -v /etc/nginx/nginx/:/etc/nginx nginx
- 此时正常启动,nginx正常运行,数据卷也是正常的
原因:
下面说一下原因:开始由于本地宿主机没有配置文件,挂载的时候,直接启动nginx容器,容器会判断配置文件,发现没有conf配置文件,故启动容器失败从而挂载数据卷也失败。
回到docker hub 看nginx有一段:
Complex configuration

$ docker run --name my-custom-nginx-container -v /host/path/nginx.conf:/etc/nginx/nginx.conf:ro -d nginx

For information on the syntax of the nginx configuration files, see the official documentation (specifically the Beginner's Guide).

If you wish to adapt the default configuration, use something like the following to copy it from a running nginx container:

$ docker run --name tmp-nginx-container -d nginx
$ docker cp tmp-nginx-container:/etc/nginx/nginx.conf /host/path/nginx.conf
$ docker rm -f tmp-nginx-container
1234567891011
结合实际来看,如果要修改配置,可以先拷贝一份配置到宿主机,然后挂载数据卷实现配置实时共享。
MindManager2018 30天无限试用
打开MindManager2018
此时MindManager2018会弹窗30天试用到期,不用管他按确定退出。
修改文件
打开 C:\Users\xxx\AppData\Roaming\MindManager\MindManager2018.ini(xxx是你自己的用户名)
[MindManager]
InstallTime=1582085643
LastLoading=1582085835
你会看见上面那样的内容,只需要把 LastLoading 后面的值复制替换给 InstallTime(这就是为什么第一步要打开一下软件,因为要更新 LastLoading 最后一次打开的值) ,然后保存退出再打开就又有30天试用了。
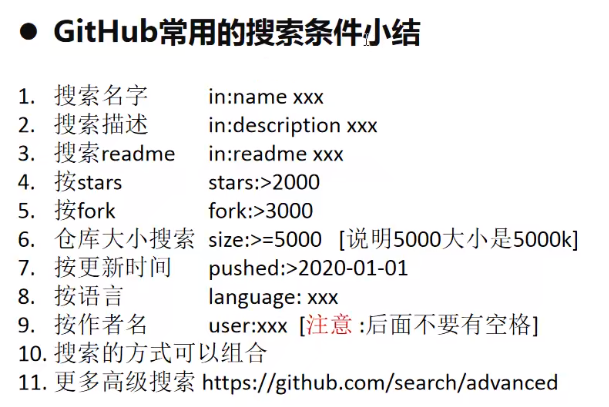
GitHub常用搜索条件
评论区